
Automat-it is moving forward with our Landing Zone solutions. The previous post demonstrated an IP management solution, Backup Policies and License Manager. This post describes some security and compliance topics as well as cost optimization, in particular we will take a look at Security Hub, Tag Policies, Resource groups and Budgets with alerts.
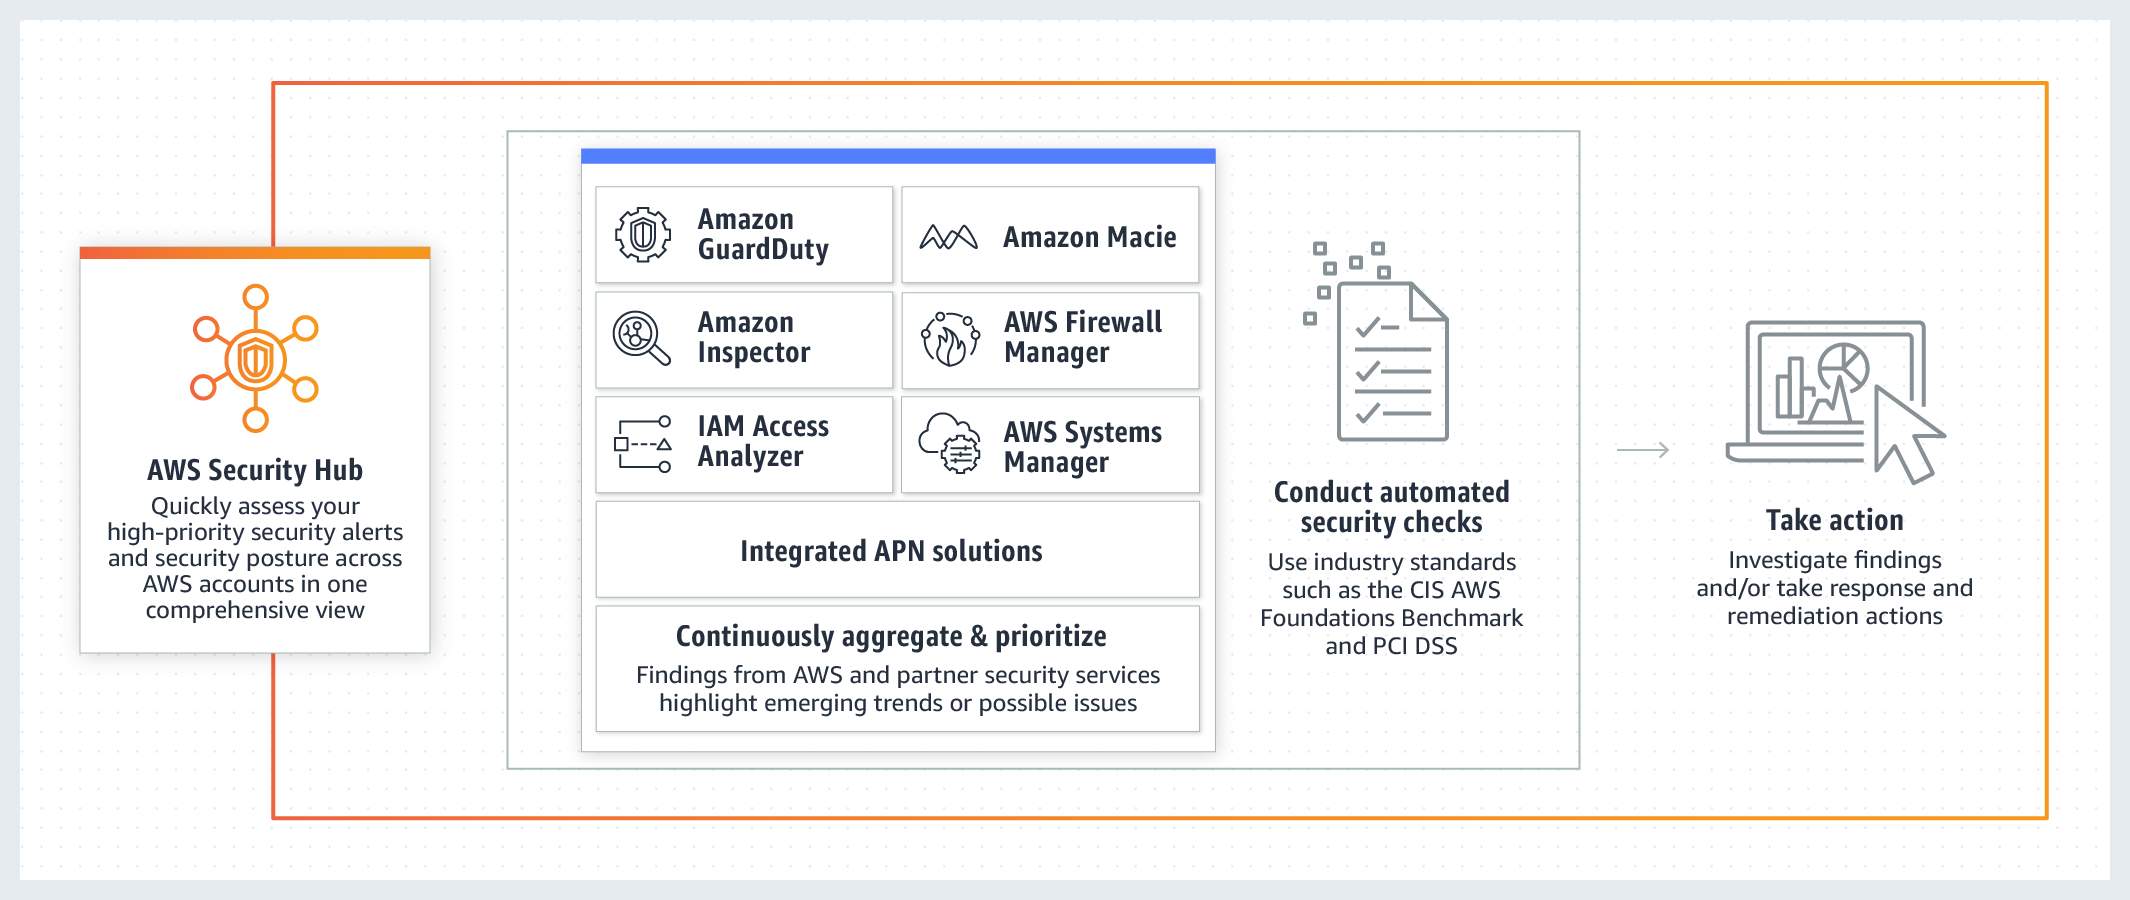
AWS Security Hub
Security is an area that should be continuously monitored and adjusted. Even if your environment is 100% secure at the start of the project, later it will be undergoing a change. New components appear in the environment, vulnerabilities appear, people make mistakes in configurations, etc. One of AWS services that can help us here is Security Hub.
AWS Security Hub is a cloud security posture management service that performs security best practice checks, aggregates alerts, and enables automated remediation. In the first post I explained how we use Detective Guardrails for compliance check and Amazon GuardDuty for threat detection. AWS Security Hub aggregates this data and other findings from sources such as:
- Amazon Macie
- Amazon Inspector
- AWS Firewall Manager
- IAM Access Analyzer
- AWS Systems Manager
- Integrations with APN solutions
AWS Config must be enabled for all accounts which will be monitored with Security Hub. AWS Config and Cloudtrail are enabled by default in all AWS accounts under the Control Tower. Audit account is the central point for AWS Config and GuardDuty, so we also enable AWS Security Hub here.
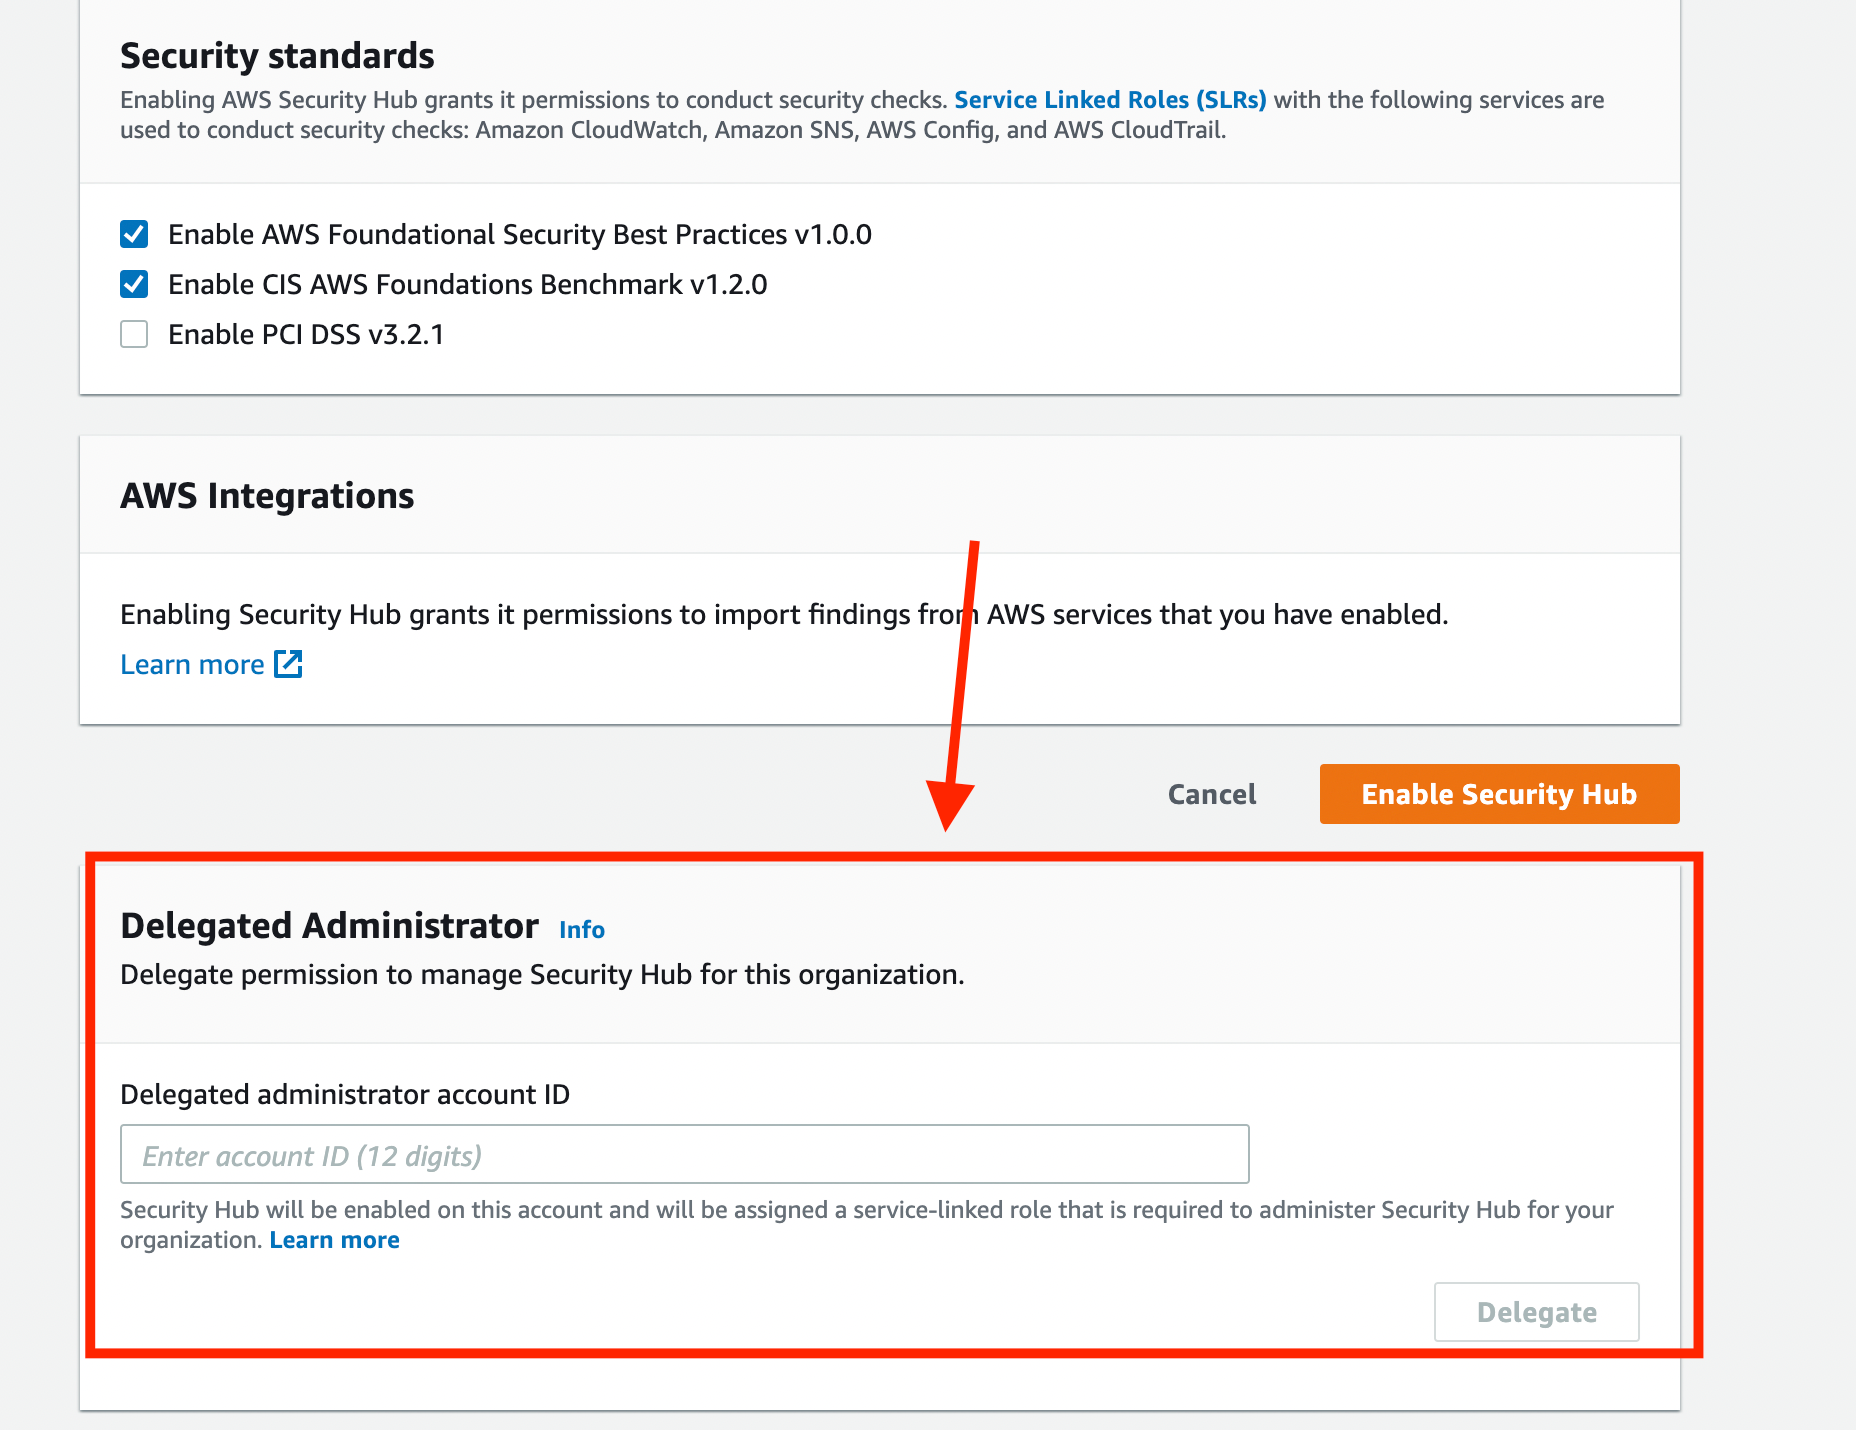
First of all you need to navigate to AWS Security Hub in the master account and delegate administrator access to the Audit account.
You can also select from a list of security standards:
- AWS Foundational Security Best Practices
- CIS AWS Foundations Benchmark
- PCI DSS
On the “Accounts” tab you can activate the “Auto-Enable” to automatically enroll new accounts to Security Hub.
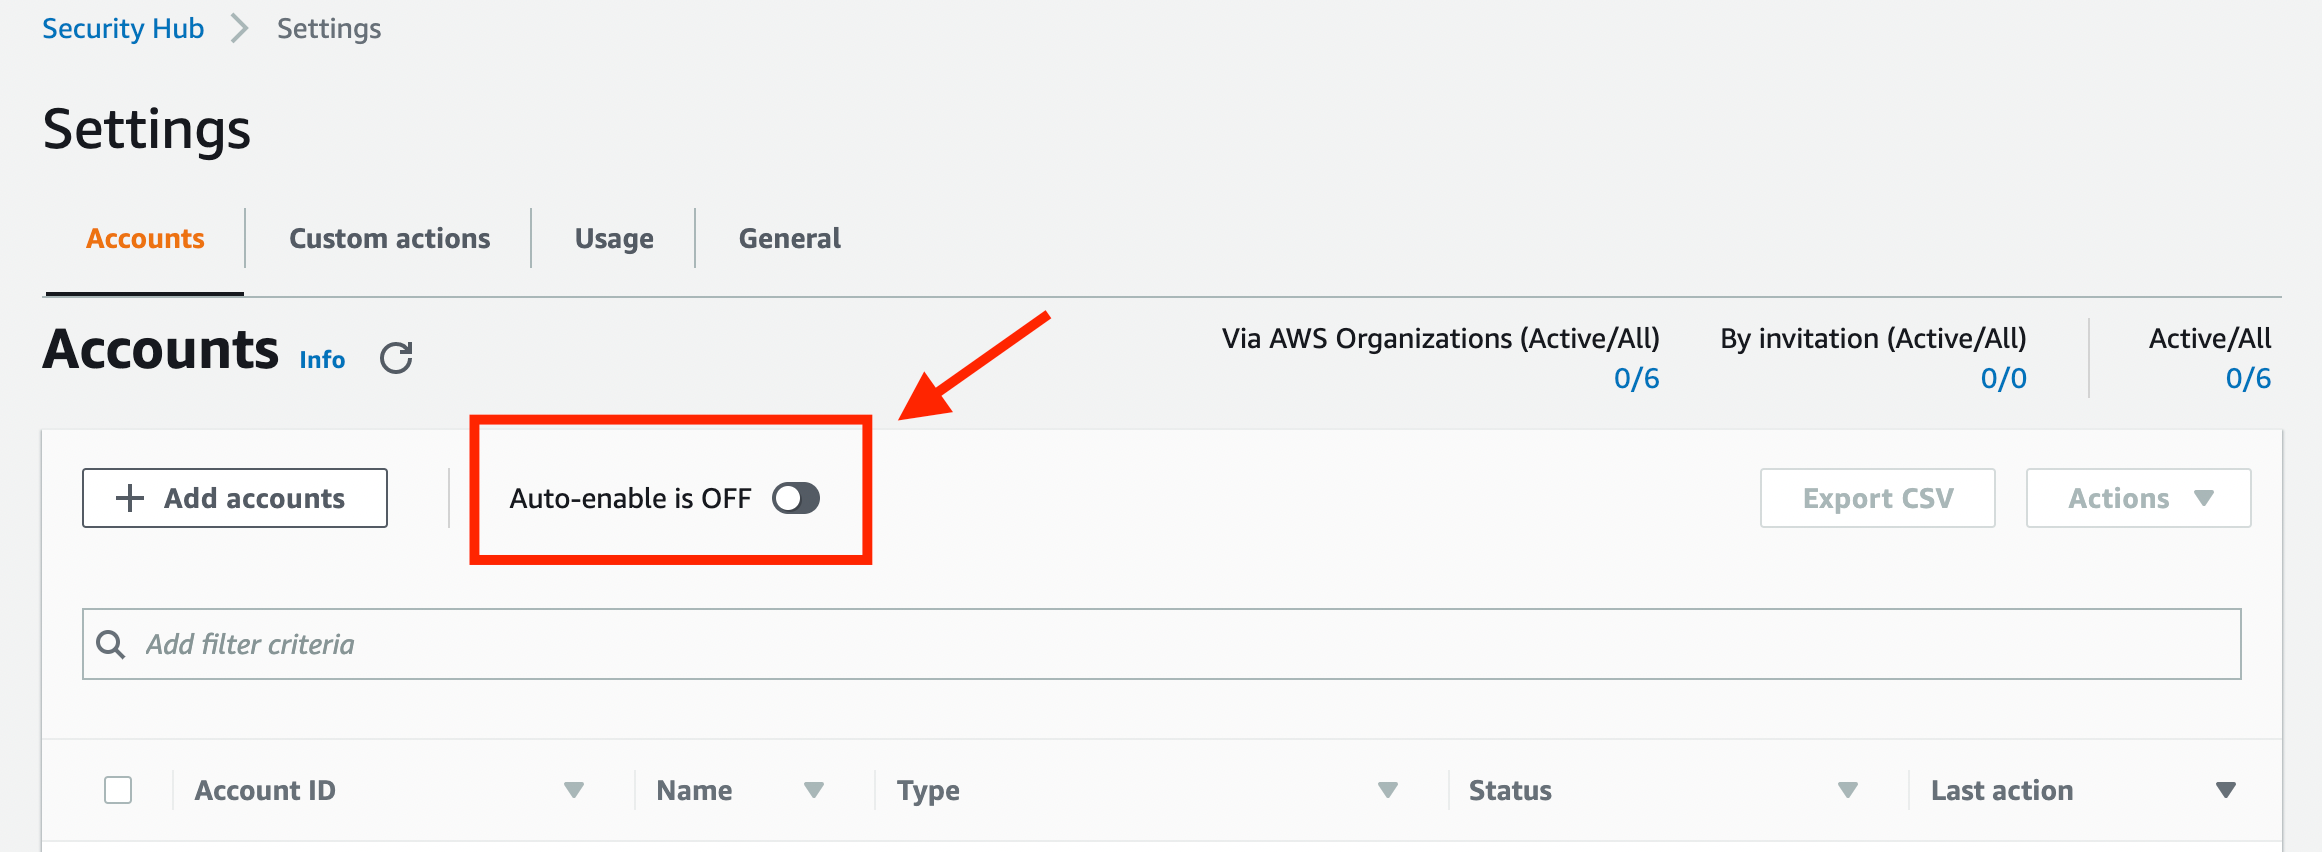
To enroll an existing account you can select the desired account on the “Accounts” tab in the Security Hub settings, then click on “Actions” → “Add member”, wait until account status changes to “Enabled”.

AWS Security Hub creates a score to show you how you’re doing against security standards and displays it on the main AWS Security Hub dashboard. When you click through to the security standard, you will see a summary of the controls that need attention. AWS Security Hub shows how the control was evaluated and informational best practices on how to mitigate the issue.
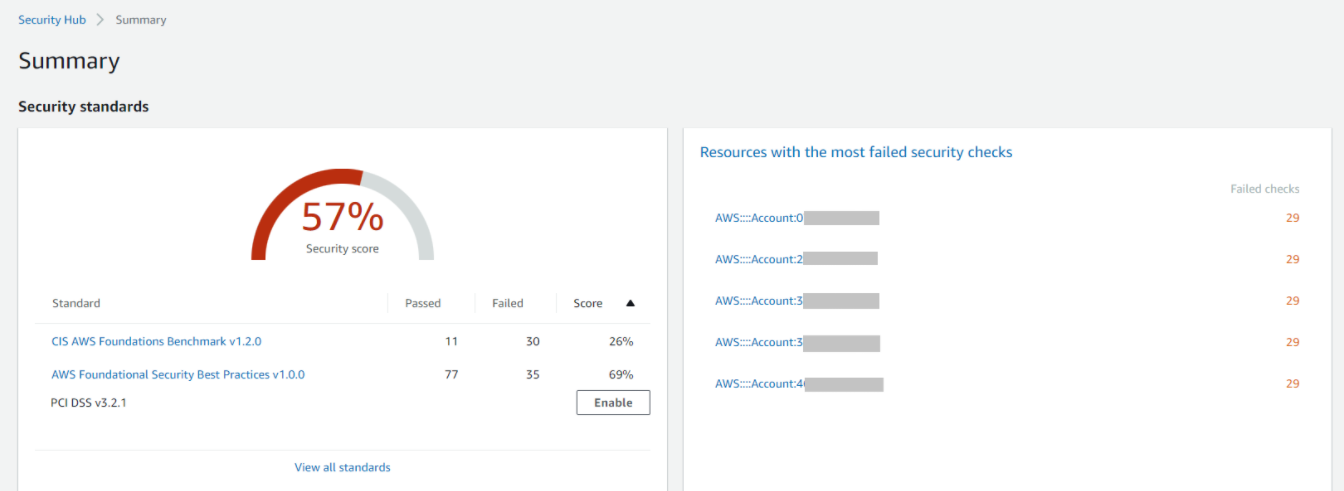
AWS Security Hub uses two mechanisms to help prioritize findings: insights and security standards. Insights are grouped or correlated findings that help you identify higher priority findings faster. You can go to the insights page and use the managed insights to identify high priority issues. You can also create your own custom insights.
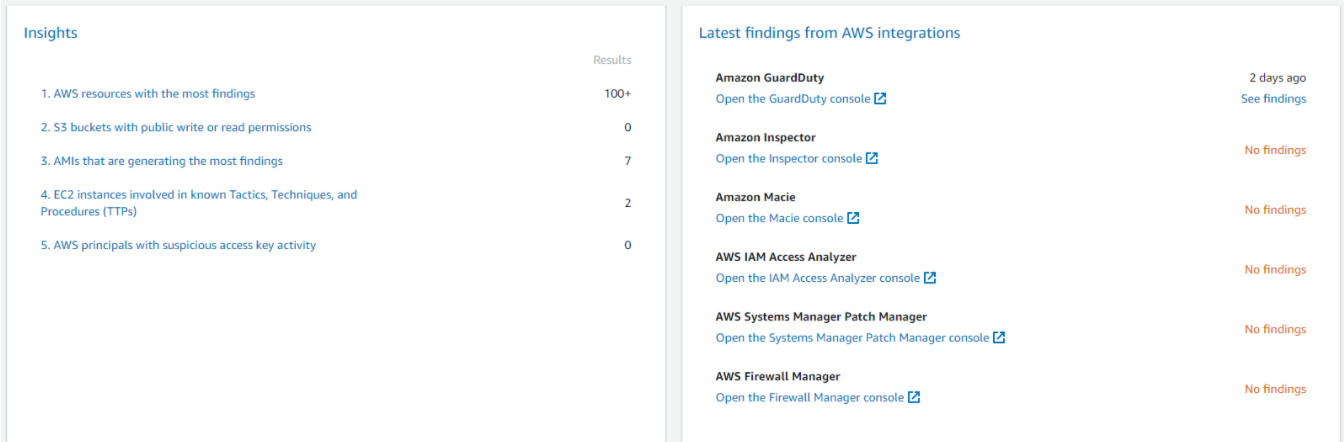
AWS Security Hub collects findings from the security services enabled across your AWS accounts, such as intrusion detection findings from Amazon GuardDuty, vulnerability scans from Amazon Inspector, and sensitive data identification findings from Amazon Macie. AWS Security Hub also collects findings from partner security products using a standardized AWS Security Finding Format, eliminating the need for time-consuming data parsing and normalization efforts. Customers can designate a master account that can see all findings across their accounts.

Summarizing the overview, there are following use cases for AWS Security Hub:
- Align workloads to AWS Foundational Security Best Practices.
- Map workloads to security and compliance frameworks like CIS and PCI DSS.
- Accelerate response time with automated ticket routing to the right people.
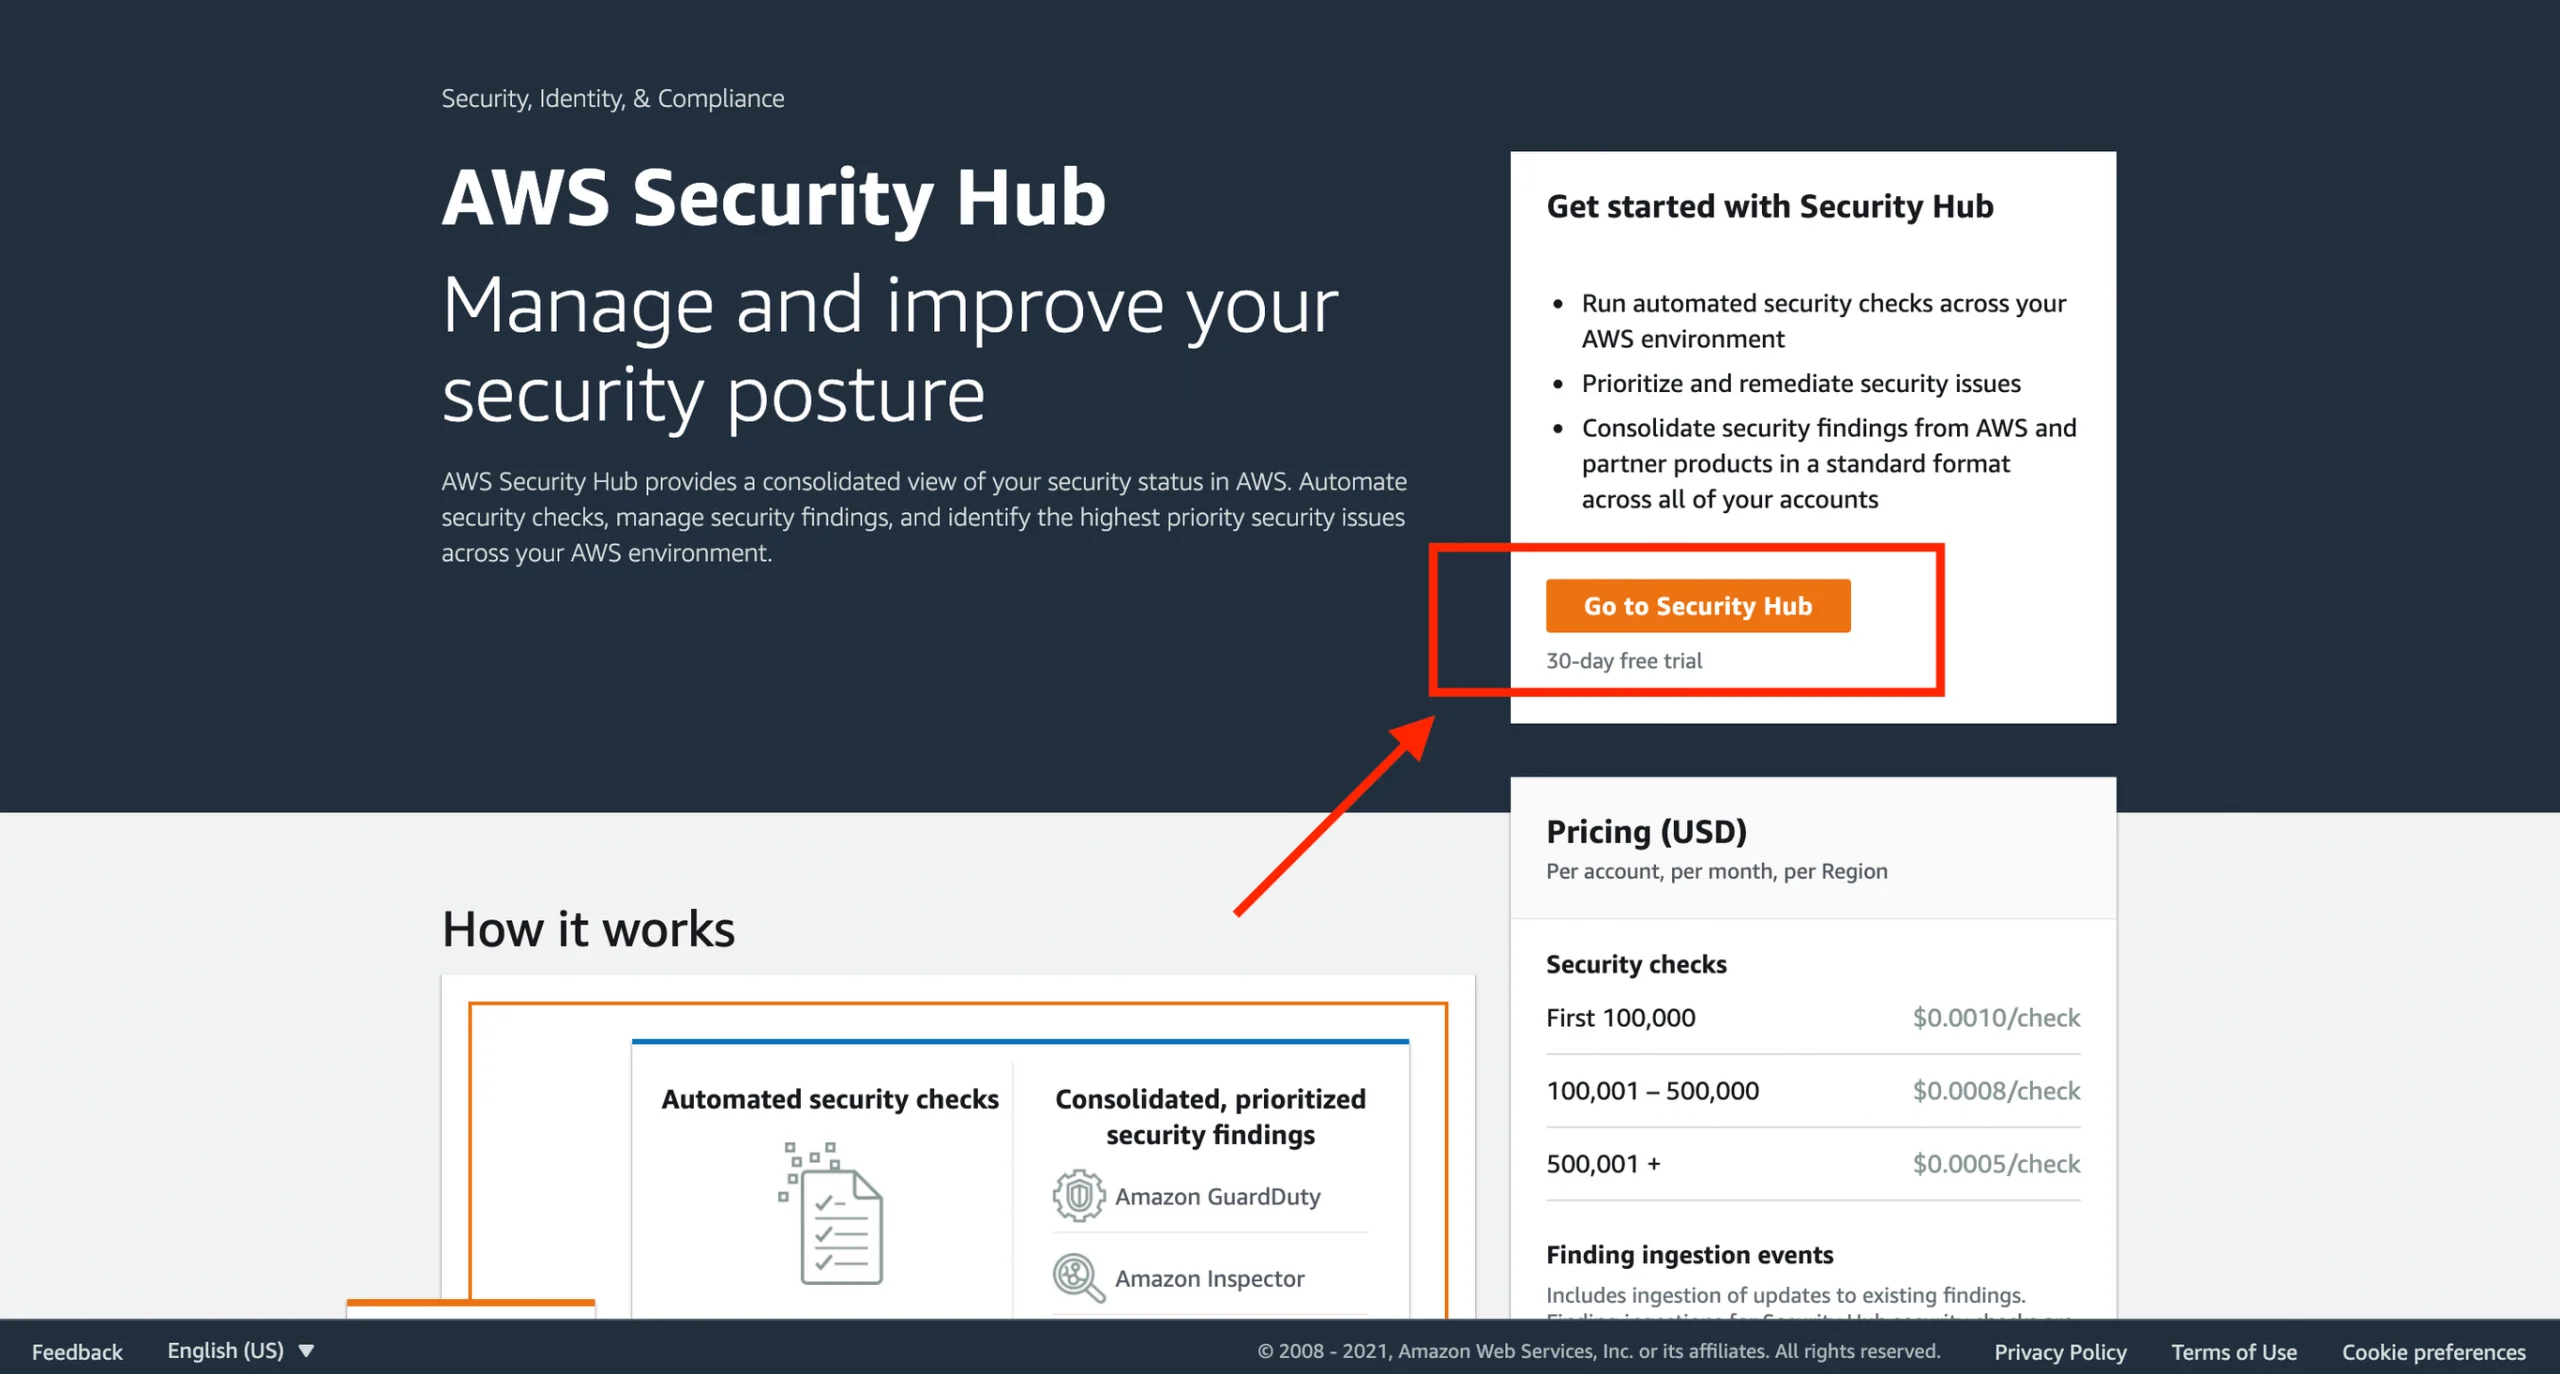
The first 30 days of using AWS Security Hub are free of charge, enjoy.
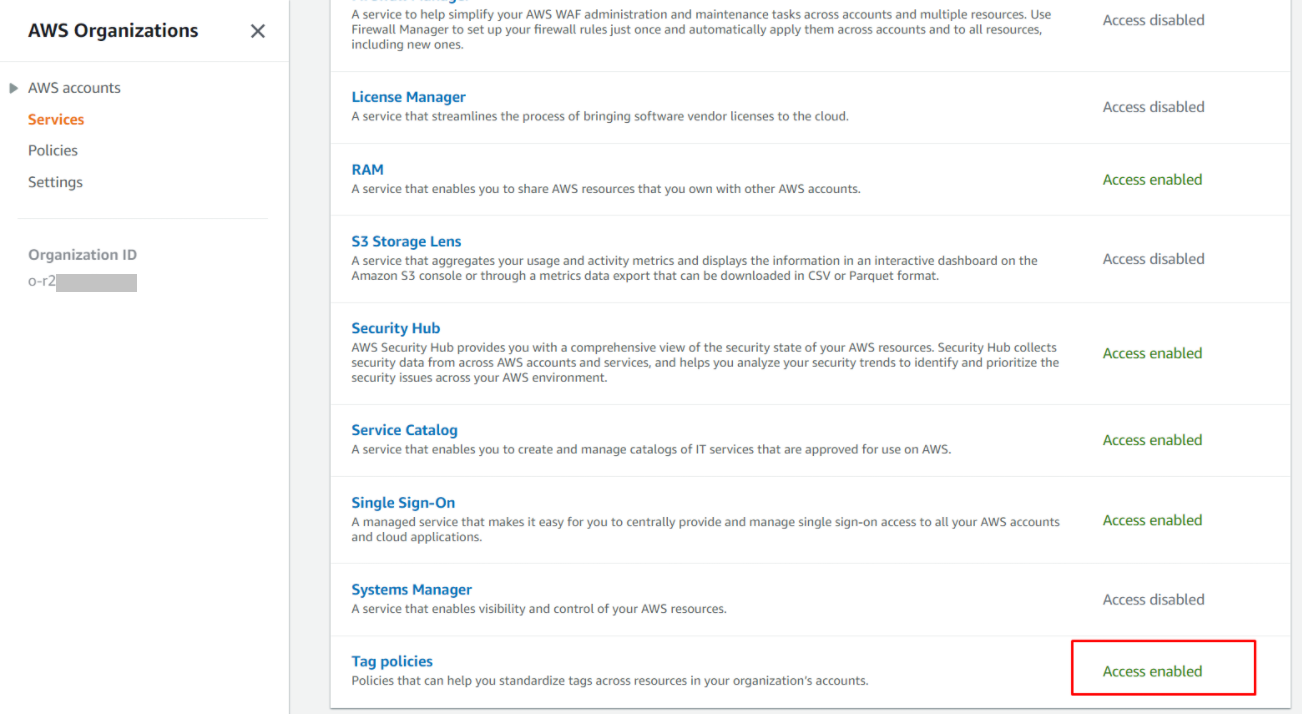
Tag Policy and Resource groups
Tag policies are a type of policy that can help you standardize tags across resources in your organization’s accounts. In a tag policy, you specify tagging rules applicable to resources when they are tagged.
For example, a tag policy can specify that when the CostCenter tag is attached to a resource, it must use the case treatment and tag values that the tag policy defines. A tag policy can also specify that noncompliant tagging operations on specified resource types are enforced. In other words, noncompliant tagging requests on specified resource types are prevented from completing. Untagged resources or tags that aren’t defined in the tag policy aren’t evaluated for compliance with the tag policy.
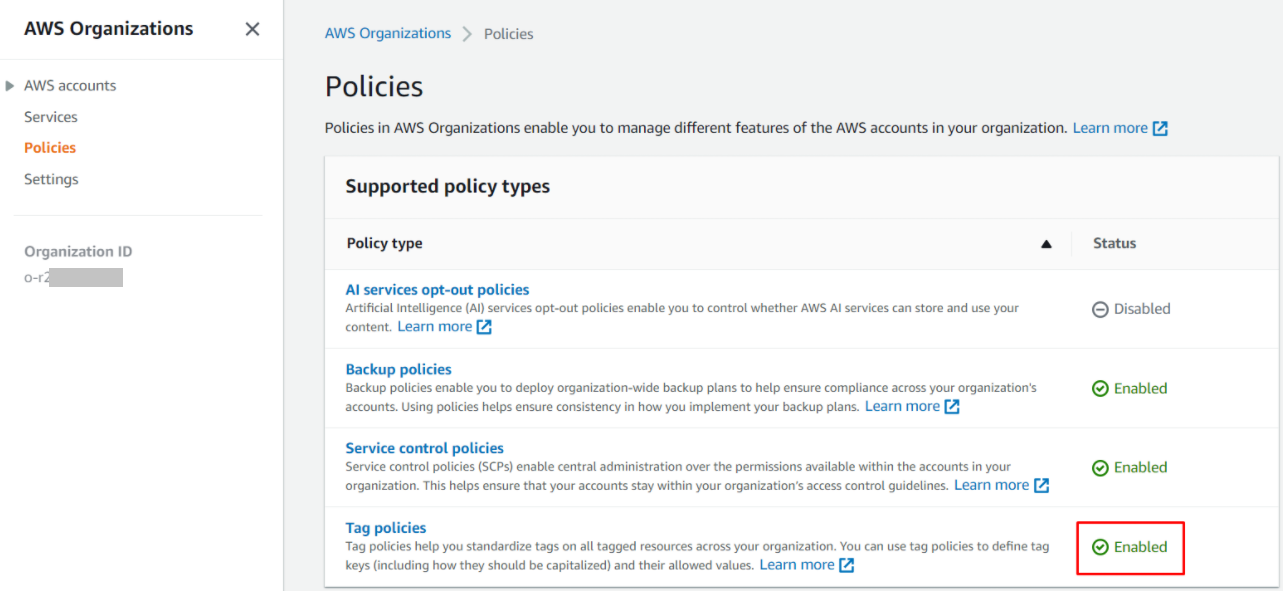
Using tag policies requires the following:
- Your organization must have all features enabled.
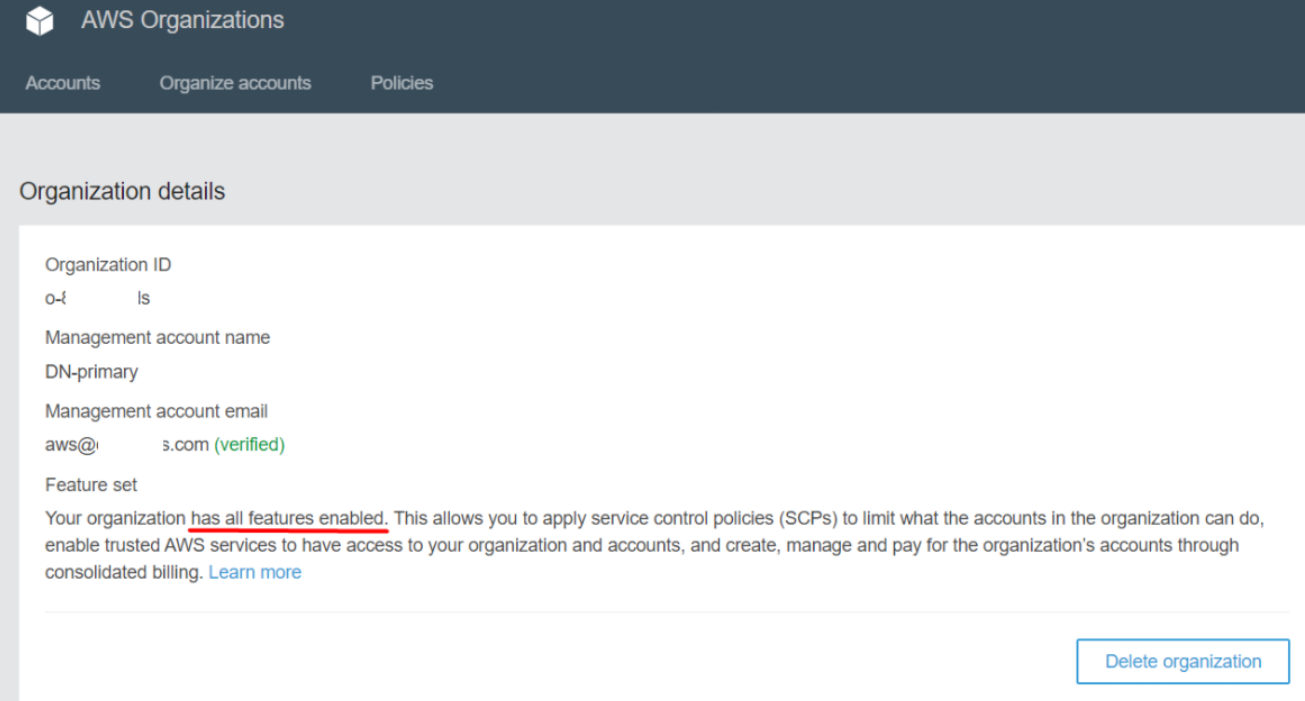
- You must be signed in to your organization’s management account (formerly known as the “master account”).
- You need the permissions that are listed in Permissions for managing tag policies (in our case we just login as admin user).
- Enable tag policies for your organization. The organization’s management account (formerly known as the “master account”).
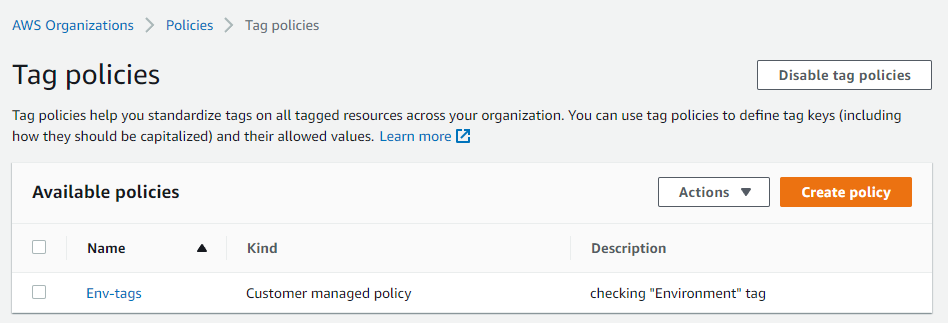
Then you can create your first tag policy:
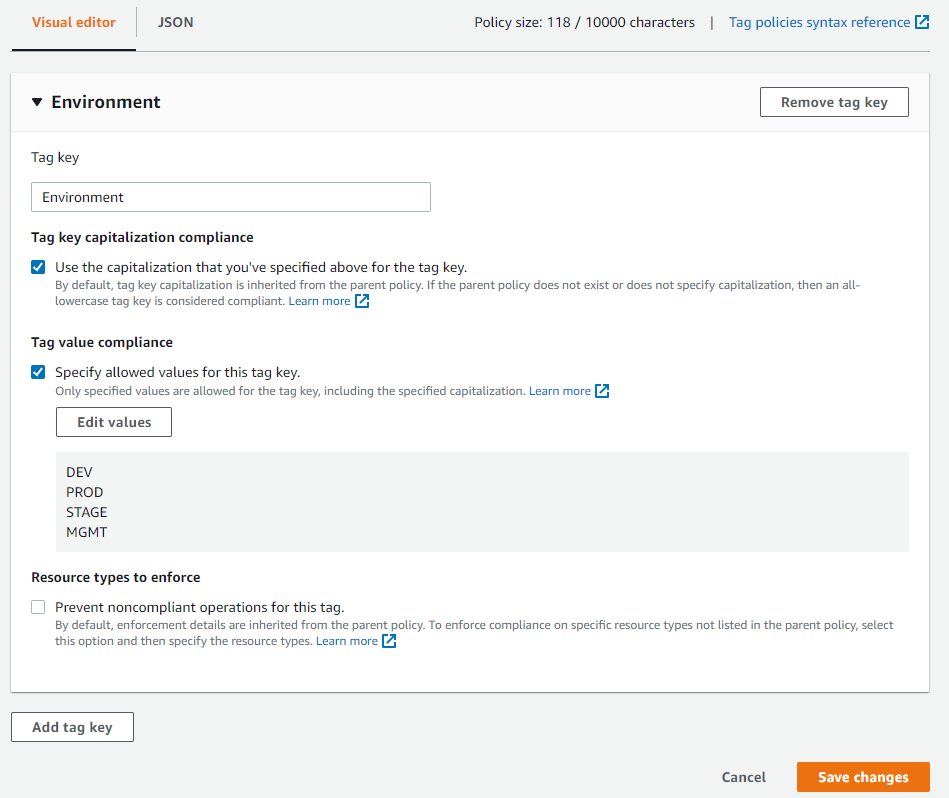
You can use either a visual editor or provide JSON. The simplest example is a policy that checks a tag key, e.g. “Environment”. You can also mandate a specific capitalization for the tag key, specify allowed values for the tag or enforce tagging for some types of resources.
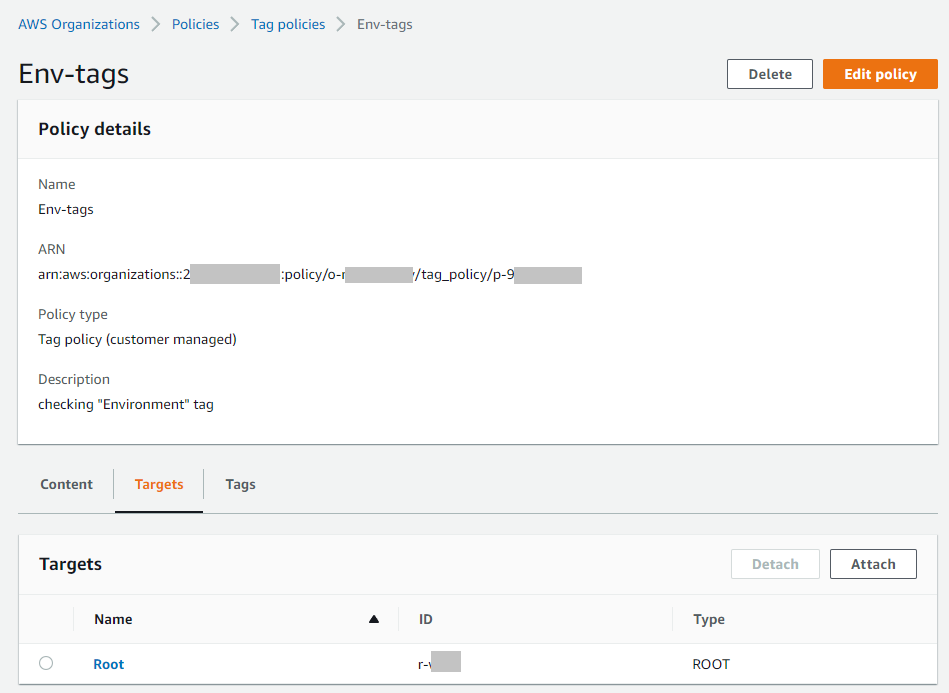
Once a policy is created, you have to attach it to an AWS account, Organizational Unit (OU), or even the whole organization (Root).
Then you can use AWS Resource Groups for monitoring compliance, in our case it is the presence of tag key “Name” for every AWS resource.
Important:
- Tag policies did not mandate or enforce that a certain tag key must be present when creating / updating AWS resources.
- Tag policies enforcement applies when certain tag keys are present and the policy defines what tag values and case sensitivity will apply.
- Untagged resources or tags that aren’t defined in the tag policy aren’t evaluated for compliance with the tag policy
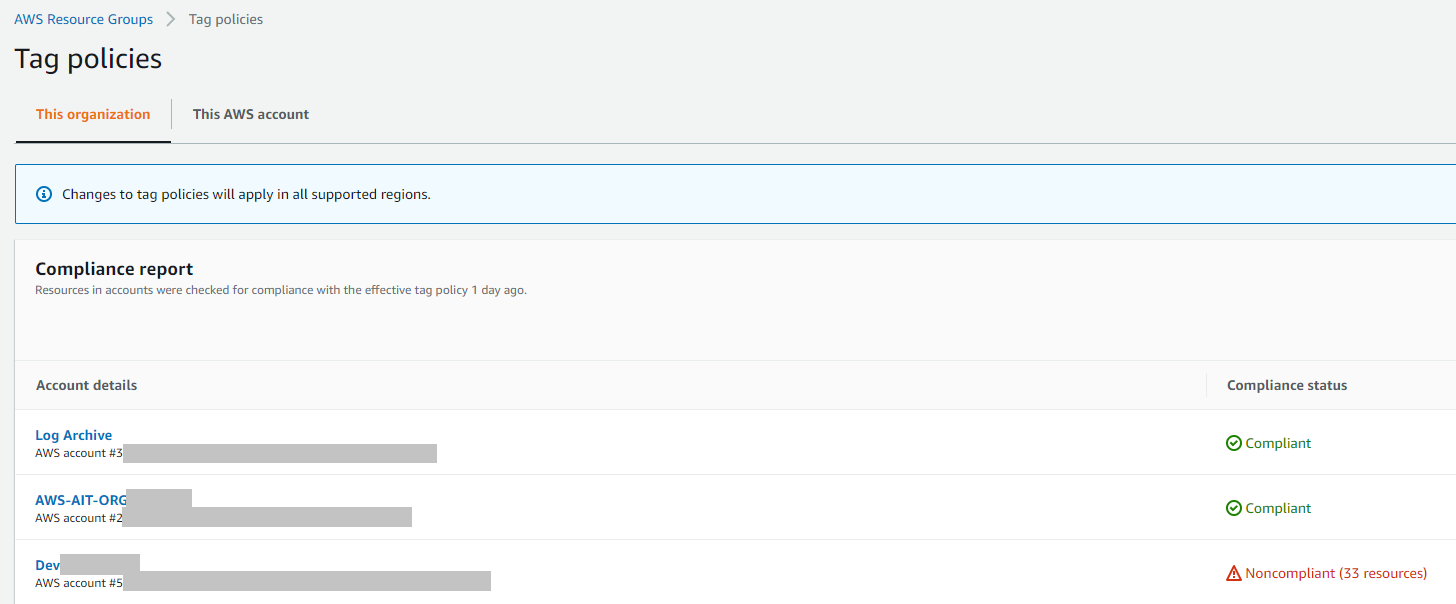
Checking the Dev account we can see all “noncompliant” resources:
Keep in mind that in the current configuration only those resources will be “noncompliant” which have value for the tag “Environment” other than “DEV”, “PROD”, “STAGE” and “MGMT”. If a resource does not have tag “Environment”, it will be skipped and considered as “compliant”.
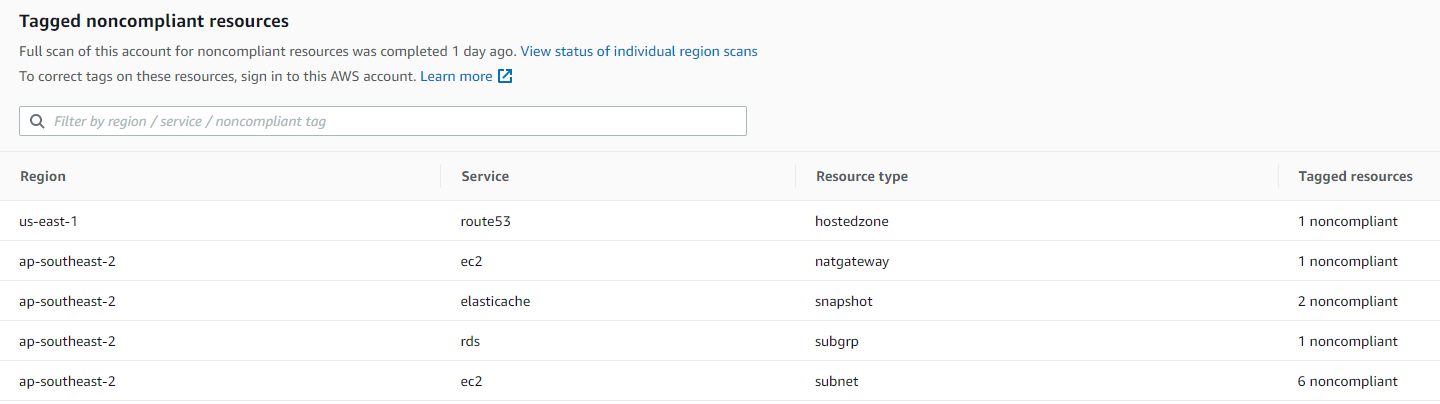
We can also generate a detailed report listing all tagged resources across your organization.

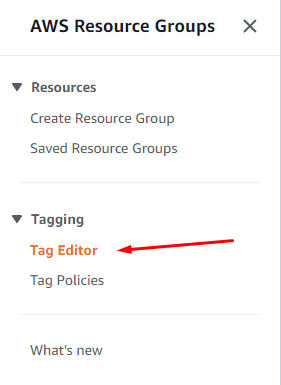
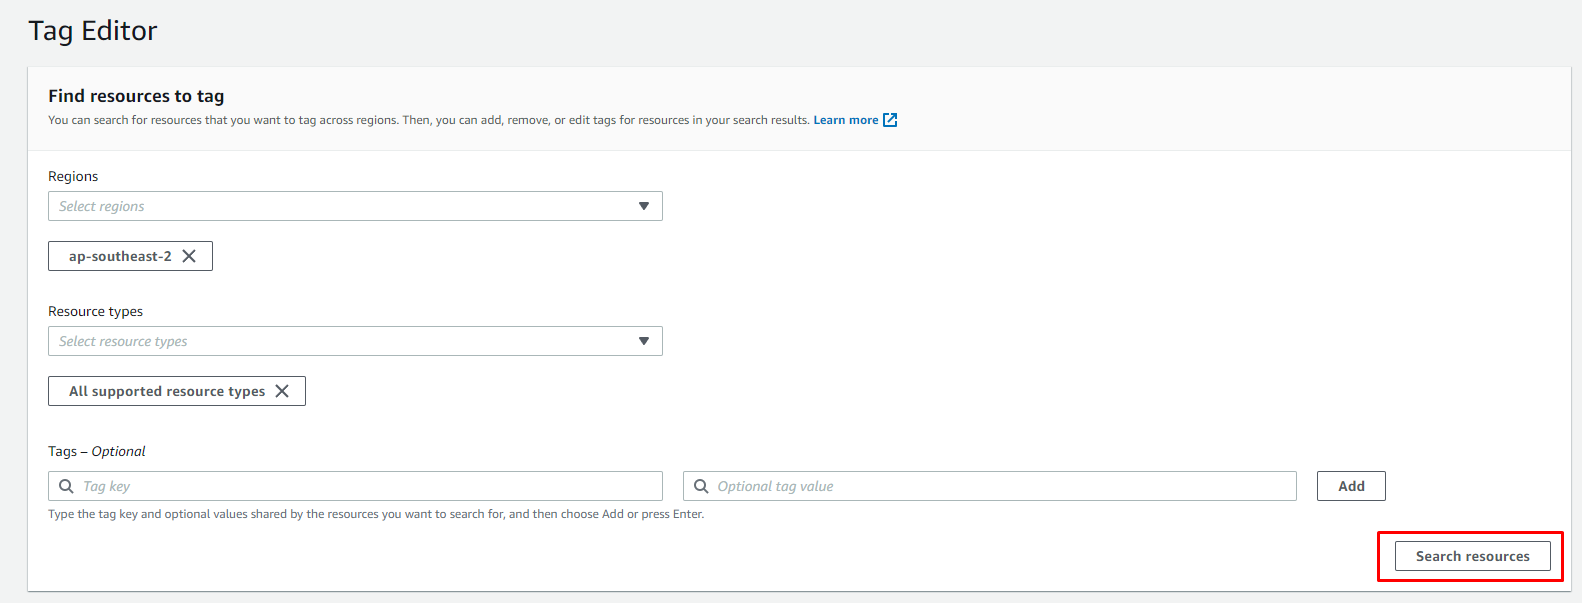
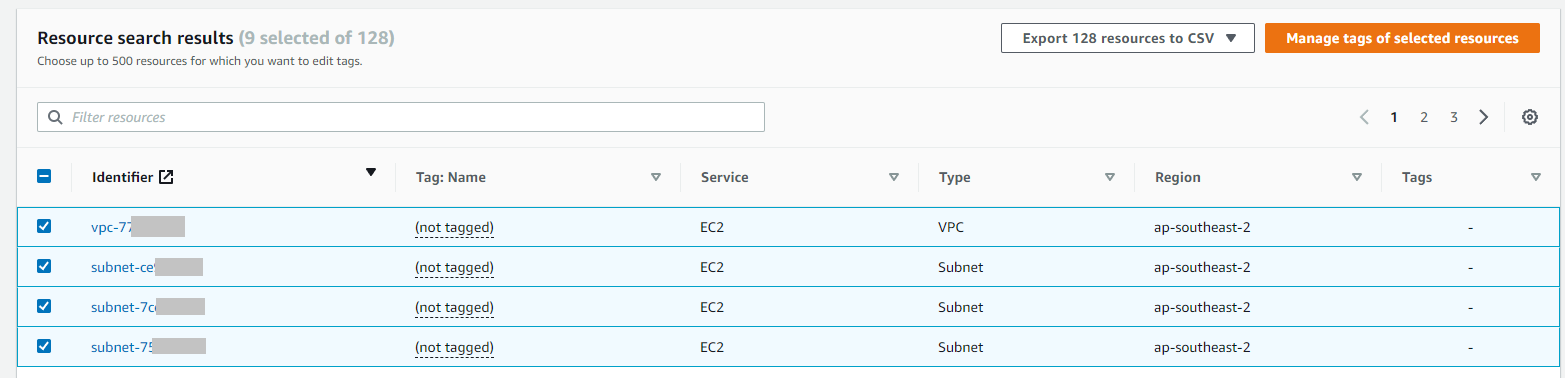
There is a useful feature of the AWS Resource Groups, which allows us to massively tag resources.
You can filter resources by AWS Region, Resource type or Resources with existing tags
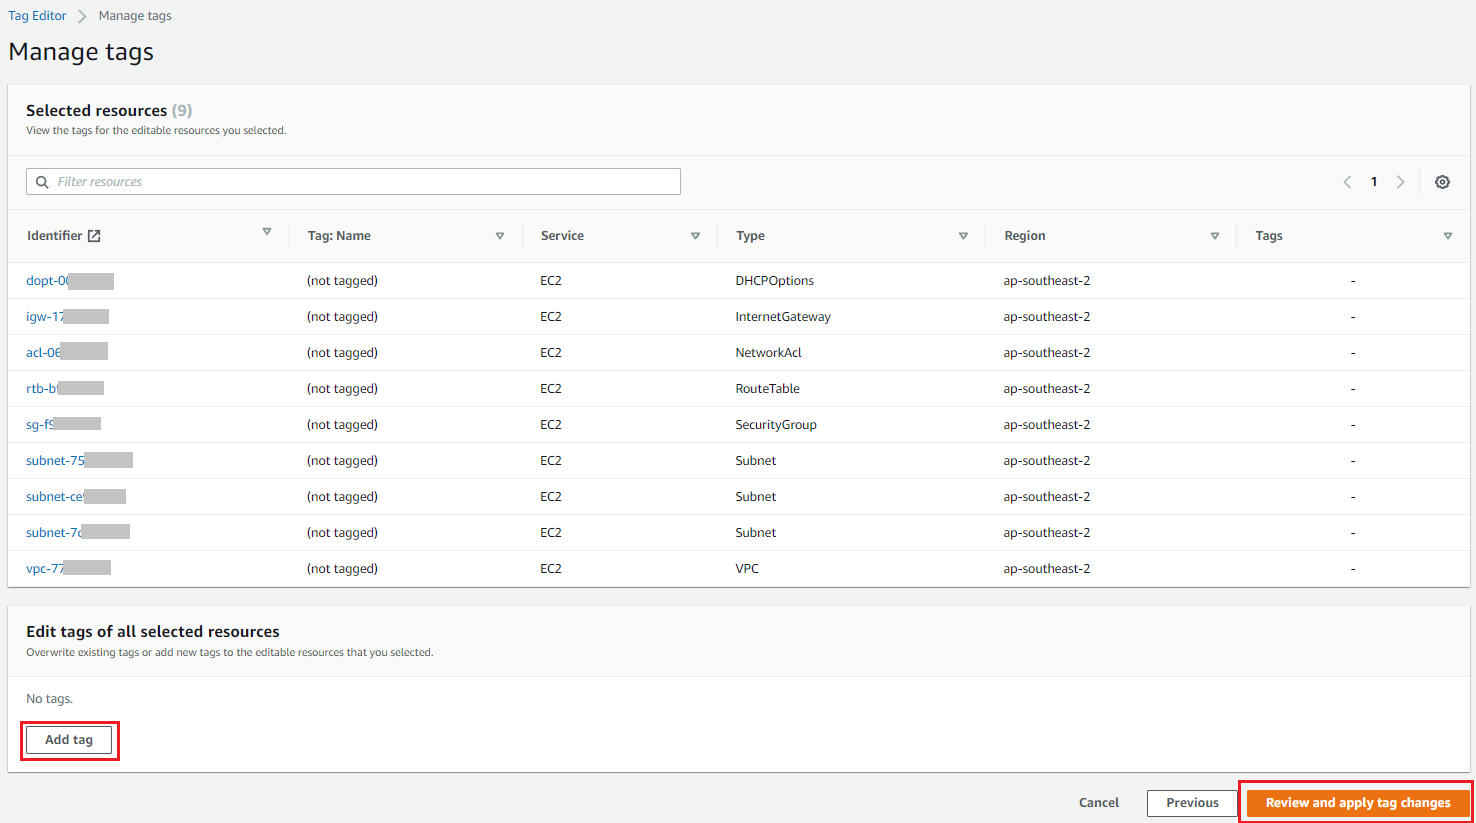
Then you can select some of the found resources and add tags for them
And add required tags
We can enhance the configuration of tag policy by enforcing compliance on specific resource types, for example EC2 instances.
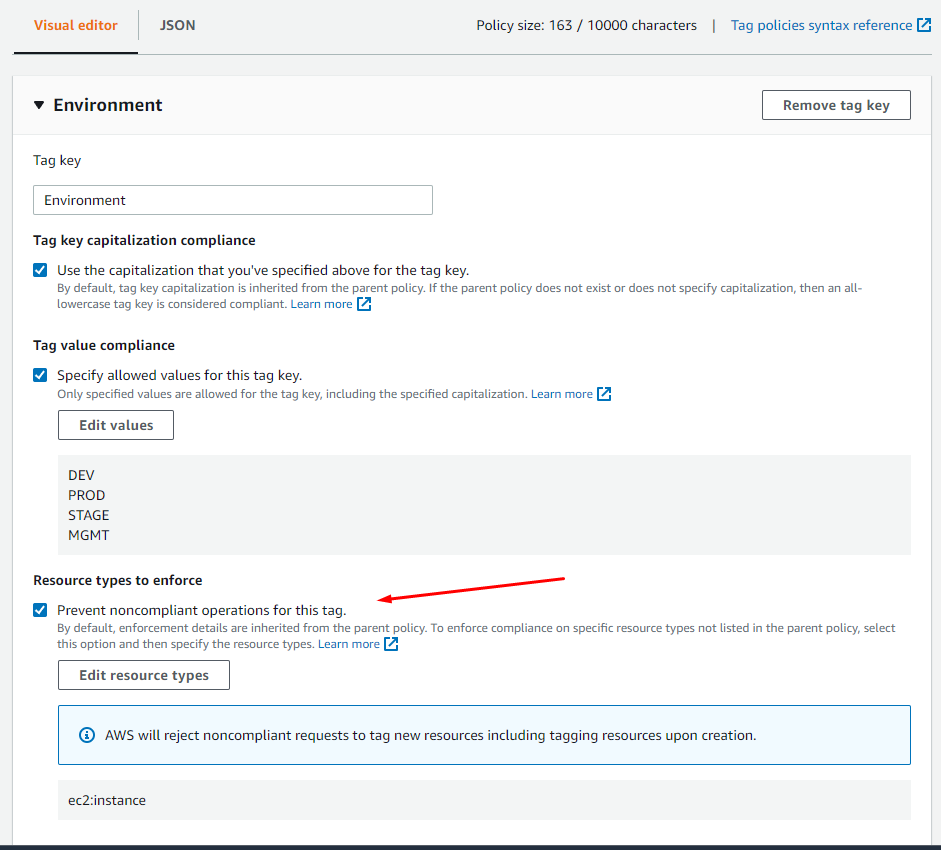
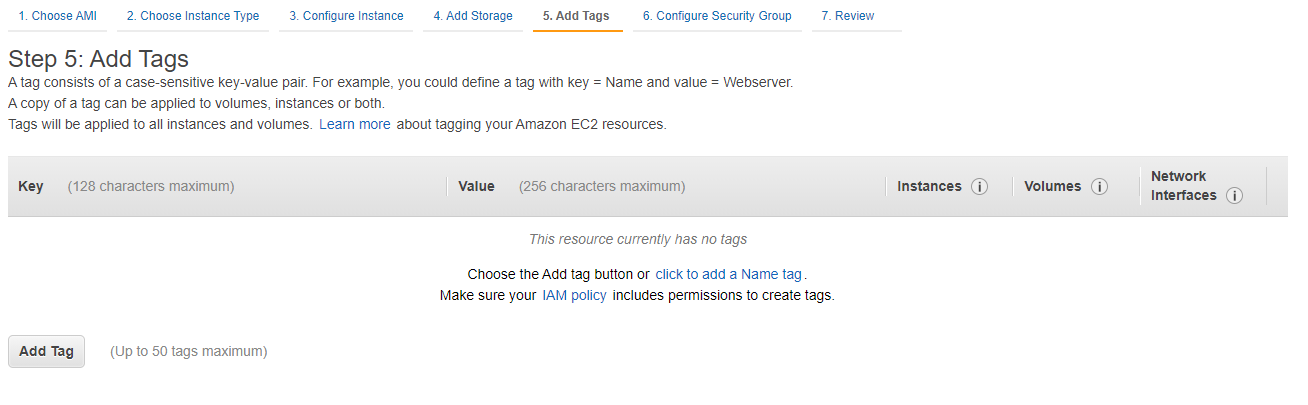
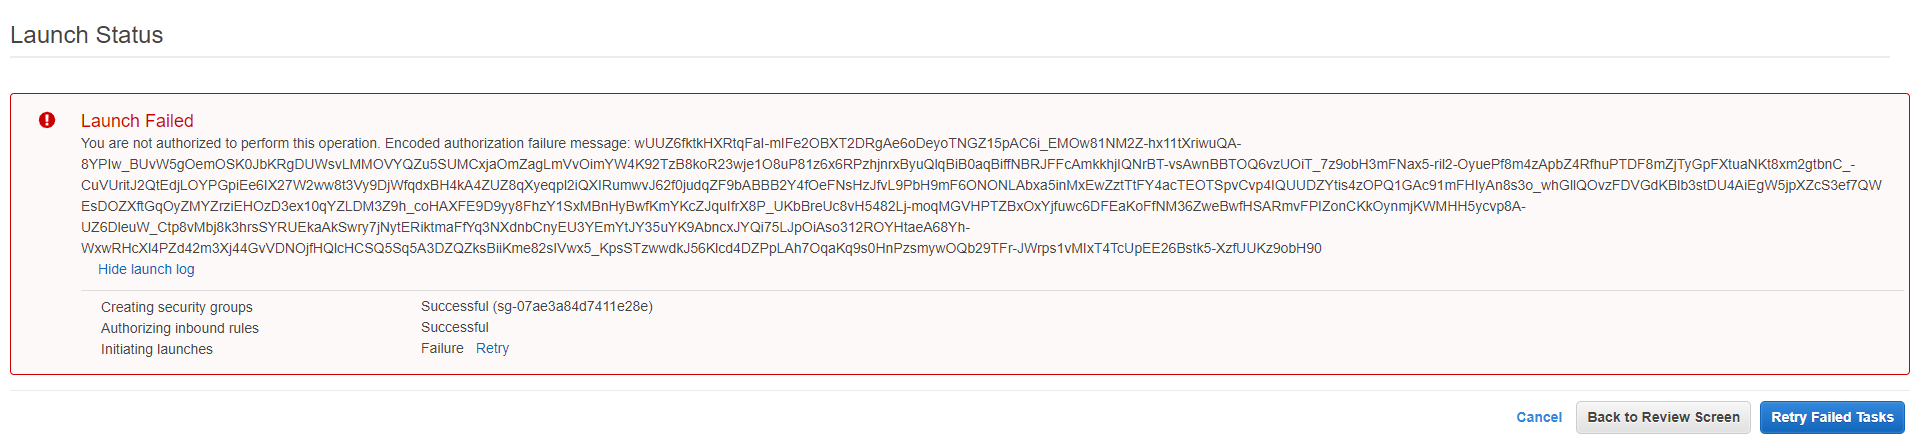
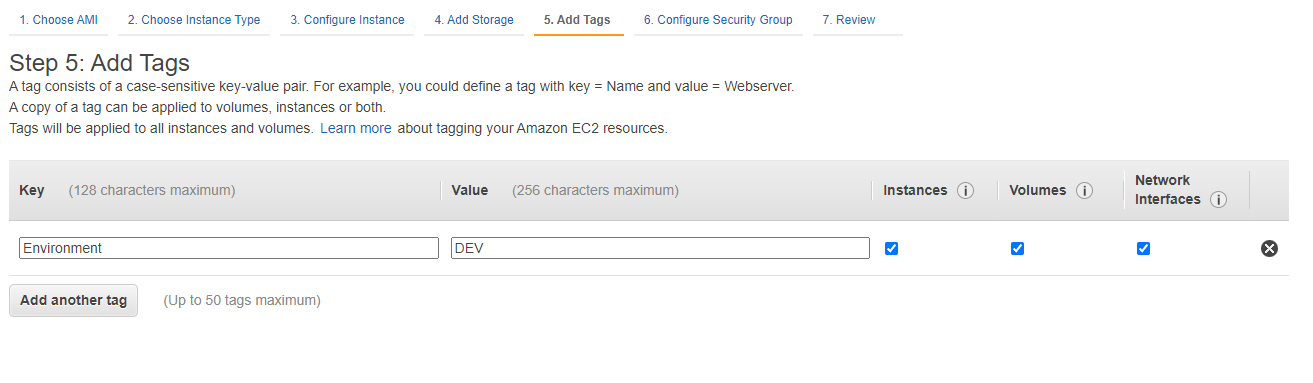
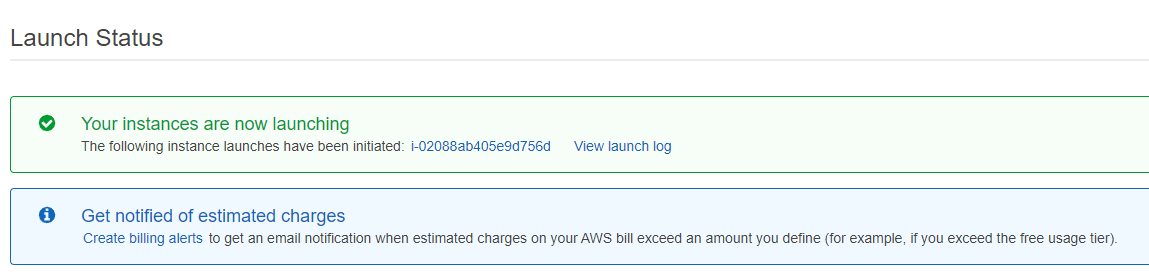
Be careful, in this case you will only be able to set exact allowed values for tag, this may break some of your automations. If we try to launch an EC2 instance with “Environment” tag other than allowed, the request will be failed.
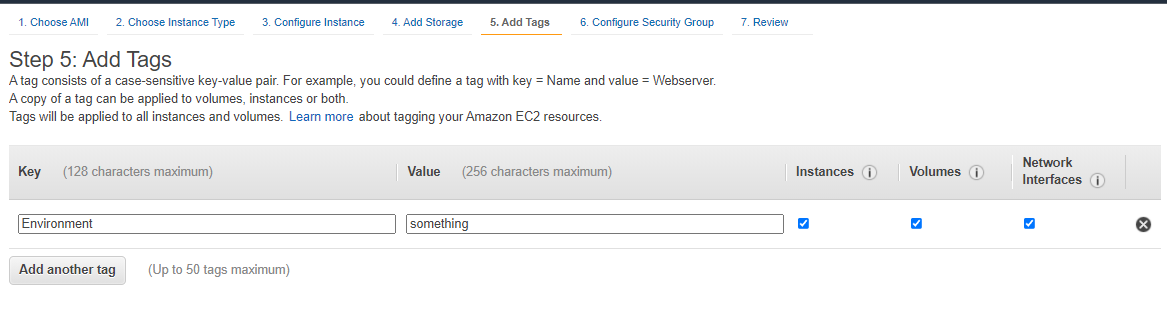
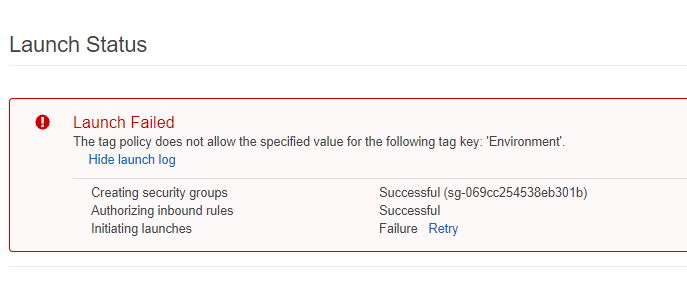
But that request will succeed if you try without the tag “Environment” at all.
In a more advanced configuration we can combine Tag Policy with Service Control Policy and prevent creating resources without required tags. For example, we can deny launching an instance if it does not have the tag “Environment”.
{
  "Version": "2012-10-17",
  "Statement": [
    {
      "Sid": "DenyRunInstanceWithNoEnvTag",
      "Effect": "Deny",
      "Action": "ec2:RunInstances",
      "Resource": [
        "arn:aws:ec2:*:*:instance/*",
        "arn:aws:ec2:*:*:volume/*"
      ],
      "Condition": {
        "Null": {
          "aws:RequestTag/Environment": "true"
        }
      }
    }
  ]
}
With the tag it succeeds.
Budgets with alerts
One great advantage of using cloud compared with on-prem is cost. Instead of having to invest heavily in data centers and servers before you know how you’re going to use them, you can pay only when you consume computing resources, and pay only for how much you consume. Such a pricing model requires different thinking and more responsibility from users. In case of wise usage of Cloud services, your environment will cost less that on-prem, you can focus on your application code instead of worrying about servers, that brings more business value.
Businesses and organizations need to plan and set expectations around cloud costs. However, cloud agility requires you to adapt your forecasting processes and tools to match the dynamic nature of your usage. AWS Budgets allows you to set up custom budgets and stay informed of how your cost and usage progress and respond quickly when cost or usage exceeds threshold.
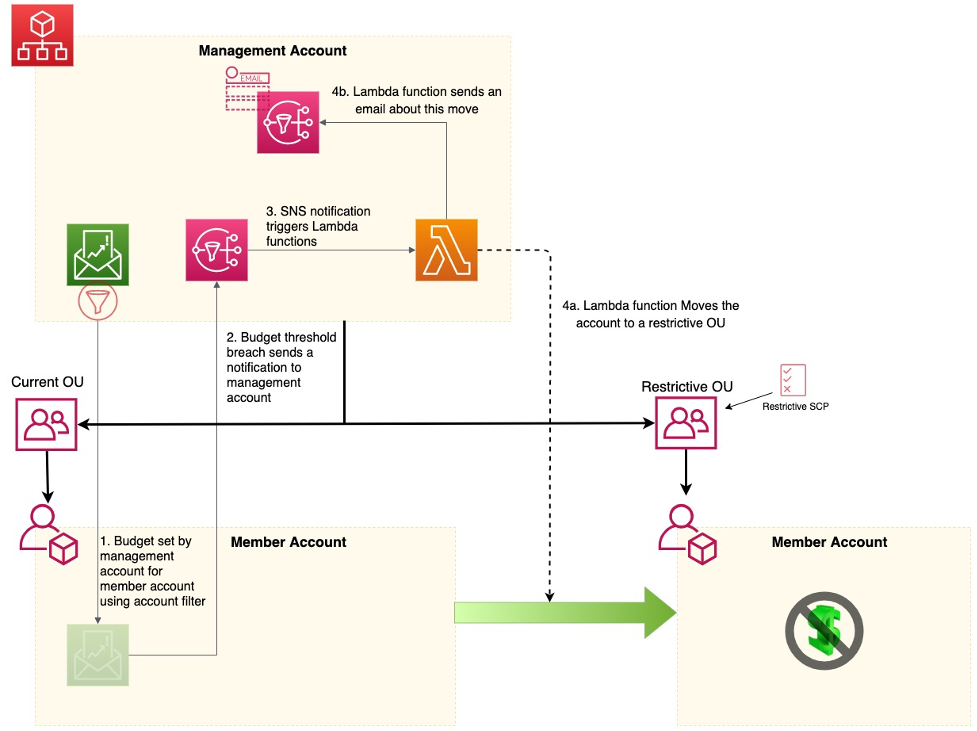
We had a real case, when a company had around 100 accounts in the AWS organization. Many developers had their own AWS sandbox account and worked autonomously. One day the company received a huge bill for Lambda and figured out that some function was running in an infinite loop. It generated logs and logs triggered a function. So how can we protect ourselves from such situations ?
Originally the solution was described in an AWS blog post , the main idea here is to set a budget for monitoring costs and in case of alert move an affected account to an isolated organizational unit (OU), where everything is denied by Service Control Policy (SCP). Lambda invocations are blocked for further investigation.
The workflow for this approach includes the following steps:
- The management account sets the budget and threshold for the member account.
- An SNS notification is sent upon breach of the budget threshold.
- The SNS notification triggers a Lambda function.
- The Lambda function moves the member account from its current OU to an OU with more restrictive policies.
- The Lambda function sends an email to notify recipients (AWS account owners or administrators) of this move.
Prerequisites
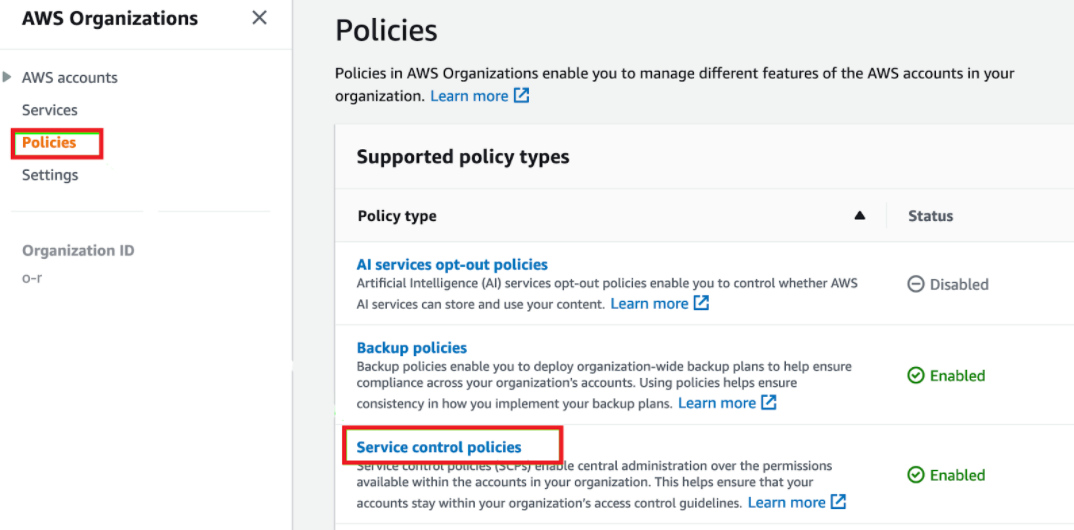
- Create the OU which would be used for Quarantine
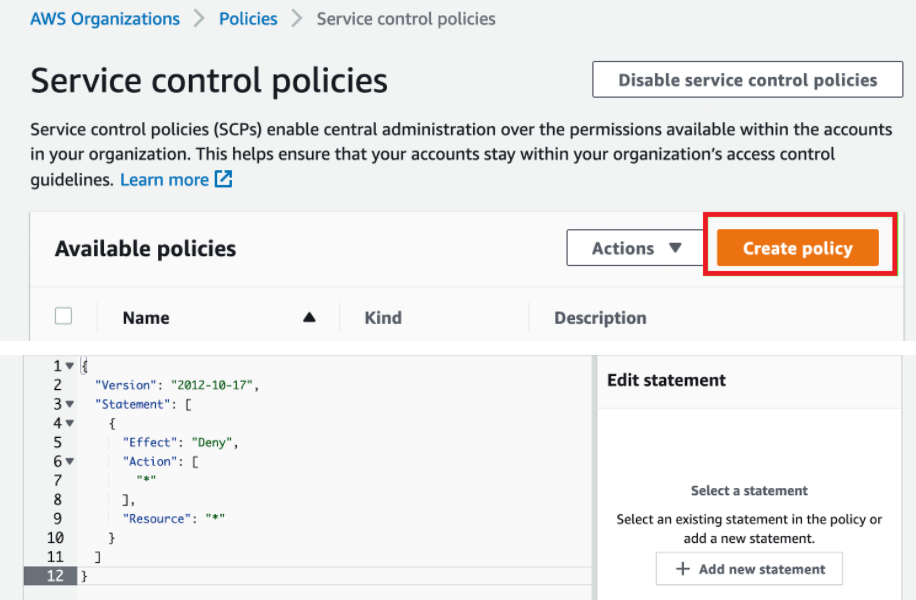
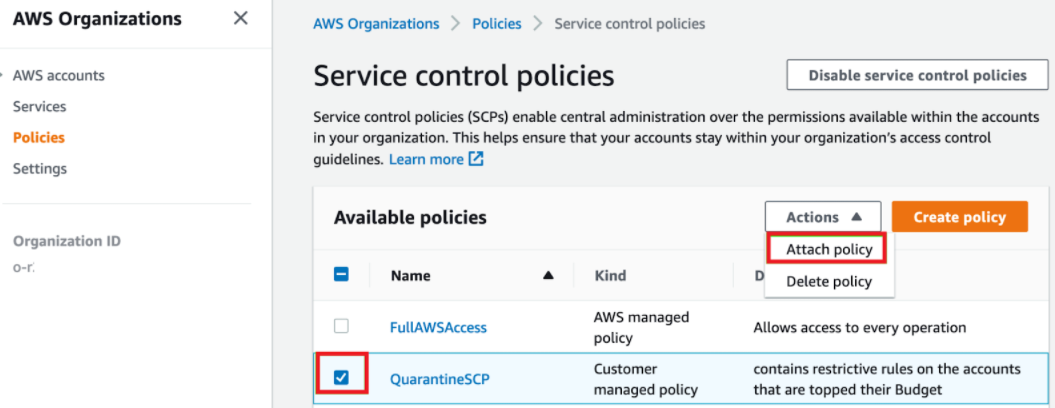
- Apply restrictive SCP to this OU:
Create new policy
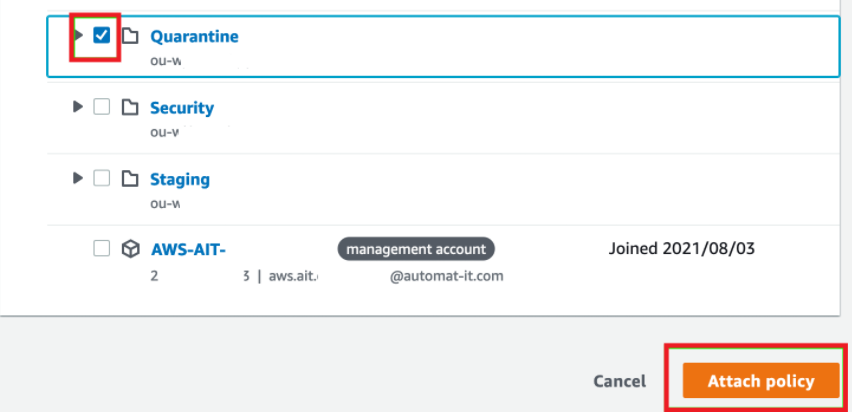
Once created – attach the newly created SCP to the Quarantine OU
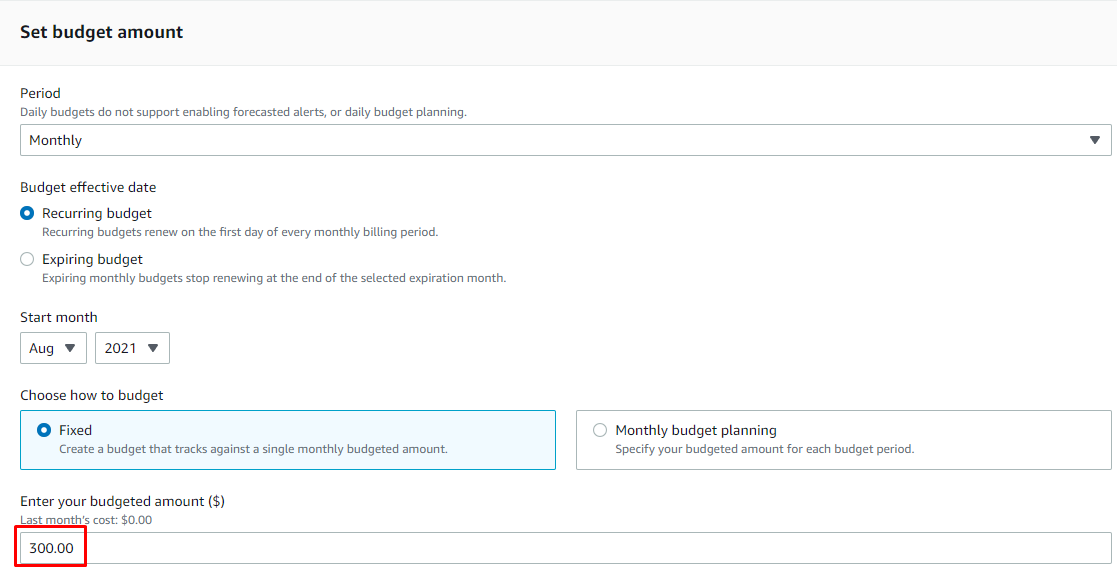
Create Create ‘Cost Budget’ and Set the budget amount for the Account
Add budget scoping to scope only single Linked Account
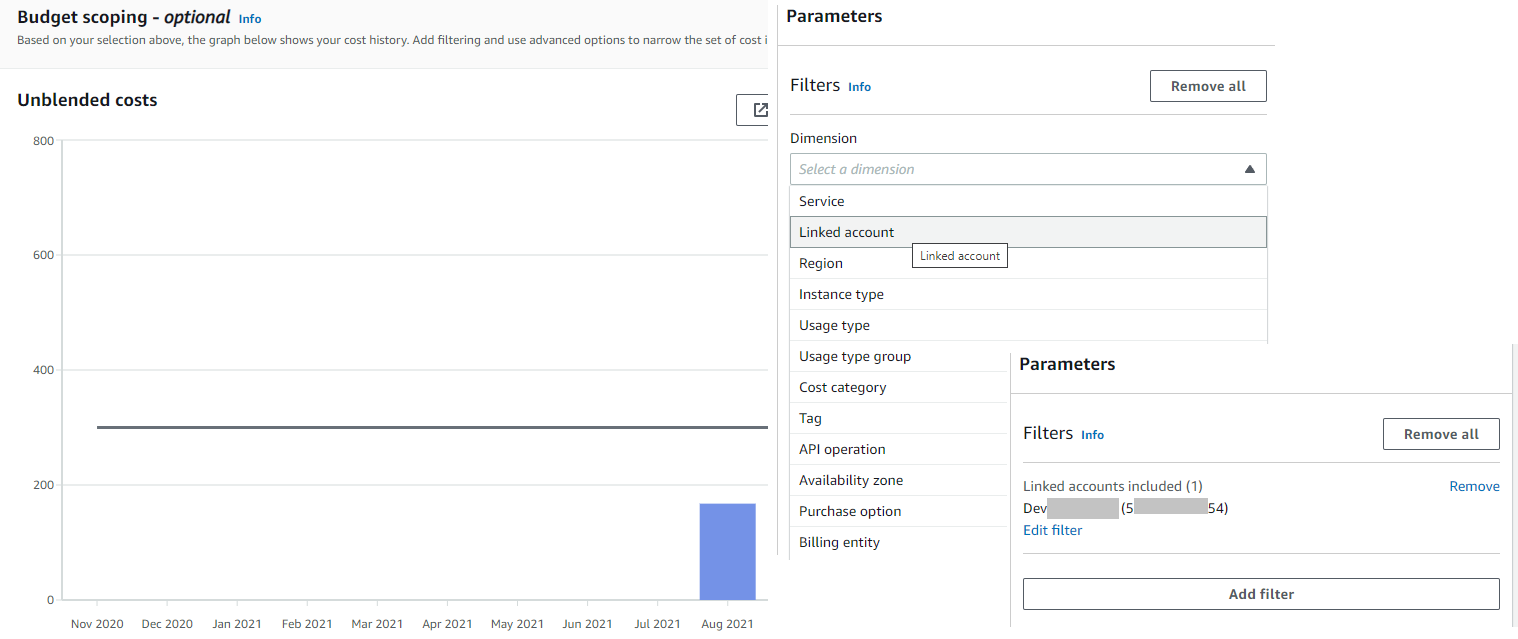
After the filter is applied, the graph on the left would be updated to show how current spending for the Linked account looks against the Budget amount set above.
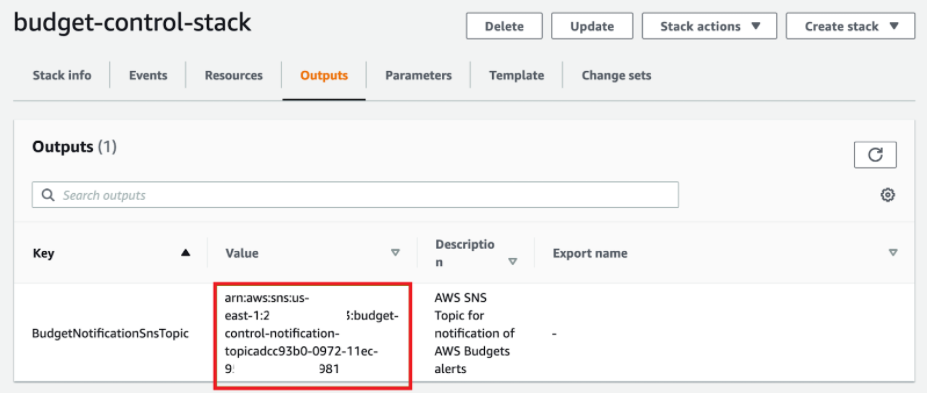
The solution is deployed via CloudFormation stack, where we need to take the output of SNS topic.
Add budget Alarm – which will trigger the whole Quarantine automation
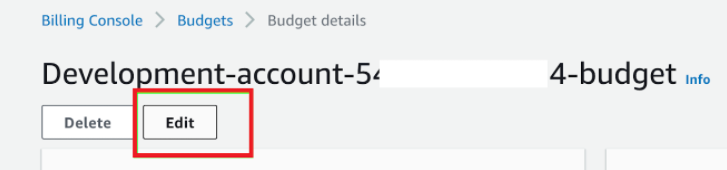
Open Budgets, find the budget created above, edit it:
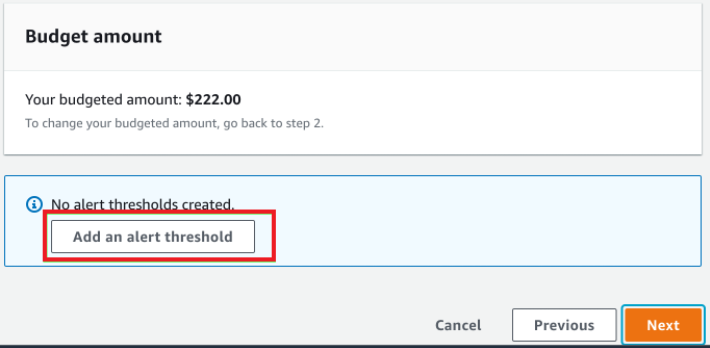
Create a new alert:
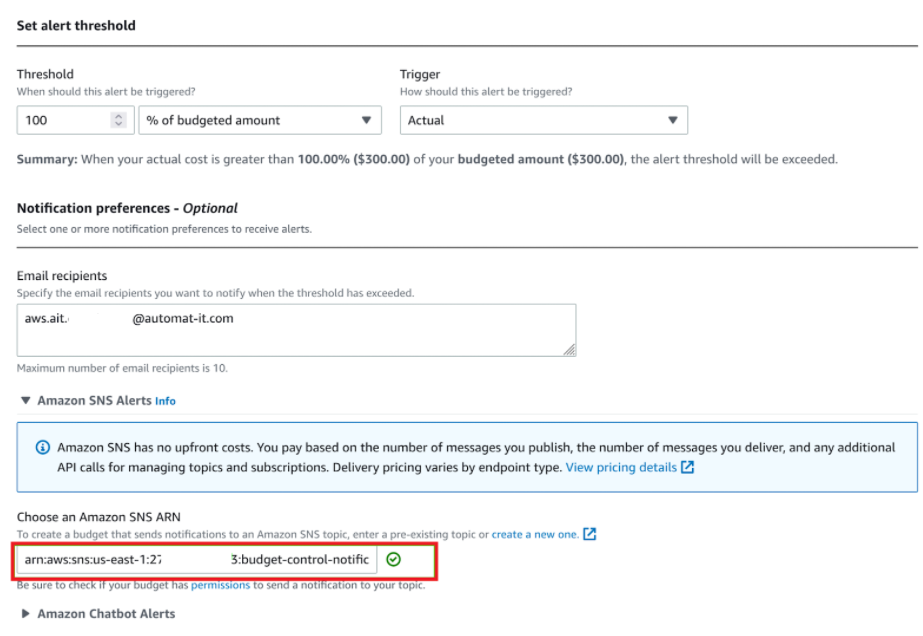
Add rule when to trigger alert; email for notification; SNS Topic to send message into:
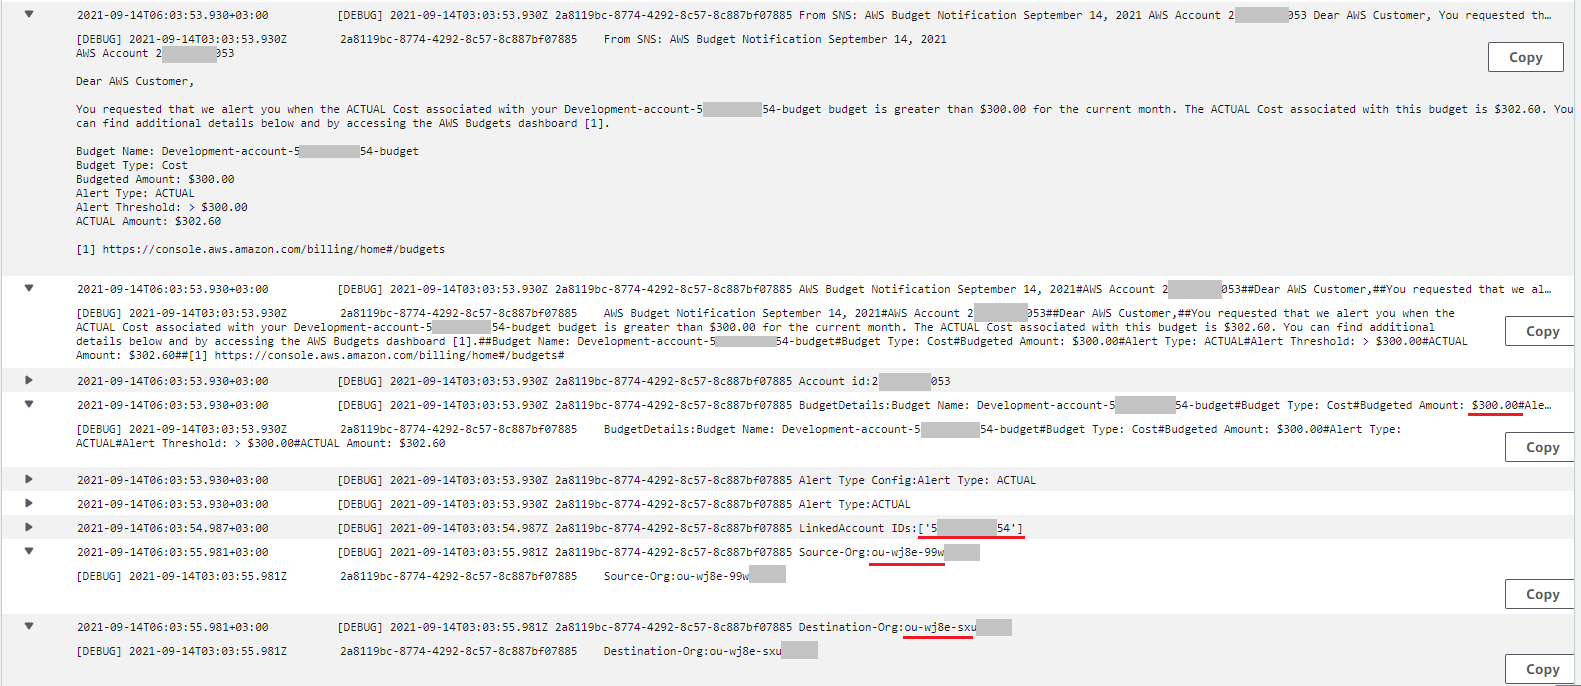
Once the budget is exceeded the SNS notification triggers the automation and the Account (from budget’s scoped Linked Accounts) would be moved to Quarantine OU. Below is an example of Lambda logs:
Keep in mind that if some servers like EC2, RDS, ElastiCache, etc. were running in the account, they will continue to run and generate costs. You need to add another automation for stopping servers. The described solution stops new events and helps in this particular case with Lambdas.
Conclusion
The last three posts demonstrated many cool things for better managing multi-account AWS environments, but the list of possibilities and improvements is endless. Automat-it is continuously working on new features and solutions for our customers using AWS services, so … to be continued.